2023年1月31日星期二

What is a temperature transmitter?

 A temperature transmitter is an electronic device used to send a temperature measurement over two wires to the processing unit. The transmitter is responsible for converting the small electrical signal from the temperature sensor into a more readable signal for the processing unit. In most cases, the signal is sent to some sort of programmatic logic controller (PLC) or receiver. 

If you are thinking about using thermocouples, resistance temperature detectors (RTDs), or thermal resistors and are wondering how to communicate their micro-signals to the industry standard 4-20mA, then you must use a transmitter.

Transmitters are commonly referred to as transducers because of their close proximity in definition and can be used interchangeably.

Transmitters are physically designed to accept and deliver many different types of inputs and outputs. They require a power supply voltage and have different physical shapes depending on your application.

How do temperature transmitters work?

Transmitters aim at amplifying and filtering the signal from the temperature sensor. How this is done varies slightly based on the sensor in use. 


For example, when using a RTD, a Wheatstone bridge is used to create a small voltage across its extremities. This signal is then amplified to produce a 4-20mA signal. Sometimes, this analog signal is converted to a digital signal (ADC) to allow for additional functions (such as calibration and scaling), then returned to an analog signal.  The conditioning circuitry can be designed for resistance values from 15 to 380ohms or something similar to accommodate the full range of RTD values. 

The electronics inside the transmitter will draw 4mA from the power supply when the temperature is at the low-end setpoint and will draw 20mA when the sensor is at the high-end temperature setpoint. For example, if your temperature range of your sensor is 0-100 ℃, then a 4mA signal would correspond to 0℃ . In the same way, 20mA would represent 100℃. Using 4mA as the low reference makes it much easier to notice when your system is malfunctioning. That being said, transmitters are designed for numerous inputs and outputs.

What are the inputs of a temperature transmitter?

The most common types of inputs for  Rosemount temperature transmitters are thermocouples and RTDs.Thermocouple Input

In the industry today, transmitters for thermocouples are normally designed for the base metal thermocouples. Those are type: K,T, J, and E. That doesn’t mean that you won’t be able to find transmitters for other types of thermocouples but they may be more expensive.

Thermocouples have two wires, so the transmitters will have two input terminals where the wires can be connected. It is important to wire the thermocouple correctly. The transmitter should be purchased with cold junction compensation. Cold junction compensation is used as a reference for the junction that is immersed in the environment. 

Thermocouple transmitters will have a Zero and Span dialog that will be used for calibration purposes. You must fine turn the device using these potentiometers, if you notice your device is reading incorrect values.

Professional Transmitter Supplier, providing you with high-quality temperature transmitterpressure transmitters from Rosemount, Siemens, ABB and other brands.

2023年1月29日星期日

How to clean a computer touch screen?

 An industrial touch screen is an industrial monitor with a touch function. When the industrial environment is harsh or the user operates improperly, it will cause the industrial touch screen to malfunction, so it is necessary to carry out regular cleaning and maintenance. So, what are the correct cleaning methods? How to clean a computer touch screen? How to clean the touch screen without causing damage?

7.Industrial Touch PC lcd Computer Monitor China Wholesale 8.jpg

1: Choose Ultrafine Fiber Cloth

Distilled water or special commercial touch screen cleaners.

2: Steps/Methods

(1) Turn off the touch screen and unplug it from any power source.

(2) Use a dry, lint-free cloth to gently wipe the surface of the screen to remove any dirt or debris.

(3) If the screen is particularly dirty or greasy, you may need to use a cleaning solution. Mix a small amount of mild soap or alcohol-based cleaner with water, and use a soft, damp cloth to gently wipe the screen. Avoid using harsh cleaners or abrasive cloths, as these can damage the screen.

(4) Once you have finished cleaning the screen, use a dry, lint-free cloth to dry it thoroughly.

(5) If the touchscreen has a protective overlay or screen protector, be sure to clean it as well.

(6) It's important to handle the touch screen gently and avoid applying too much pressure, as this can damage the screen. If you are unable to remove dirt or stains using the above method, you may need to contact the manufacturer for additional cleaning instructions.

 3: Tips

In order to avoid unnecessary troubles, please do not use too hot water to clean the screen. Do not use any cleaner containing ammonia unless the industrial display manufacturer has explicitly indicated the touch screen of the product. Ammonia may damage the screen. Avoid spraying liquid or water directly on the screen. Instead, spray it on the superfine fibers, squeeze it to remove any excess liquid, and then wipe the screen carefully. Do not use tissue or toilet paper. They contain wood fibers that scratch the surface of any plastic product. You may not see scratches for the first time, but as time goes on, your screen will look like you clean it with very thin steel wool, which will make the image looks dark and a little blurred. Don't press too hard when cleaning the screen, you may damage the monitor.


These are some small tips for cleaning industrial touchscreen monitors. Besides, users should pay attention to correct operation when using industrial monitors, so as to avoid damage to the industrial touch screen as far as possible.

How to Use The Combo Rack in Three Easy Steps

The gym has its own share of mysteries.  Whether it’s all the different straight bars, or all of the specialty ones, all the different machines, or even how to execute different movements, unlocking the secrets of the gym can have newcomer and veteran alike scratching their heads.  In hopes of saving others some of the confusion I’ve experienced, today I’m going to outline the intricacies of one particular piece of equipment that tends to cause a lot of confusion:

The Combo Rack – What Can I Do With It (And How)?

If you began your lifting career in a commercial gym, it’s highly likely you did not start out benching and squatting in a combo rack.  For a lot of people, the first time they see one of these racks is at a competition (and for many, it’s only when the technical official conducting their weigh-in asks them for their squat and bench rack heights that they realize they are going to have to go examine the rack in greater detail).


REPORT THIS AD

combo (combination) rack is a competition-spec rack that you can either bench or squat out of. 

Now that we’re clear on what a combo rack is/does, we need to set it up for use.  While these racks can look confusing, there are really only three easy steps that you need to take in order to be ready to lift.


Step 1 – Bench or Squat?

If you’re squatting, you’re obviously going to need to get the bench out of the way.  While not required, you may also want to remove the spotting arms.  While they look really similar to the spotting arms on a power rack, failing a lift and dropping the bar onto these spotting arms can often cause the rack to tip or flip, because the combo rack is not bolted to the ground.  If you’re like me and sometimes squat a little crooked, you can also accidentally hit the spotting arms with your plates while squatting, which can really throw you off balance.  So, long story short – it’s good to know how to get both the bench and the spotting arms out of the way.

To remove the bench, you’re going to grab it close to the front (this is where it is heaviest) and lift up:


If you are lifting and it doesn’t budge, someone has probably locked it in place (most lifters don’t do this as the bench is quite secure without).  To unlock it, you need to look for the wingnut in front of the holder for each of the two front bench legs.  Once this is unscrewed on both sides, you’ll be able to lift the bench up and out.

The bench makes a great place to sit in between sets, so feel free to keep it nearby.

Next up:  the spotting arms.  These slide into the base of the rack:

Sometimes, they can be rather tricky to remove.  In the video you can see that I’m pushing up on the rack while pulling the spotting arm back; essentially I’m trying to make it so that less weight is pushing down on the arm so that it will come out more easily (shout out to our good friend gravity).

You may be tempted to pull the silver pieces of the spotting arms (the arm proper) out of their holders instead of removing the whole apparatus.  It’s really preferable that you don’t do this.  More pieces floating around generally means more pieces that could go missing, and honestly – if you have the time to remove the arm, you have time to remove the whole apparatus.

It probably goes without saying, but if you’re benching, you’re going to want to follow the above steps in reverse and ensure that both the bench and the spotting arms are in place.


Step 2 – Set Your Rack Heights

If you’re squatting, you are going to need to set just the rack height; if you’re benching, you’ll need to set both the rack and the spotting arms.  To set the rack height, you’re going to need to locate the pins on the outside of each side of the rack.  There should be two (one will be setting the rack at its current height; the other should either be sitting in another rack height hole, or in the storage hole).


Conveniently, the racks come with a jack attached to both sides.  All you have to do is hook it to one of the pins (you can use the pin currently setting the rack height if you are looking to increase the overall rack height; you will insert the second pin into a lower numbered hole and hook the jack to that if you are looking to decrease height).  You can make jumps of roughly eight holes at a time, so if you’re sharing a rack with someone significantly taller or shorter than you are, you’ll need to adjust the rack in two adjustments per side versus one).


Note: 

Do not put the pins in the rack such that the thick part is on the outside of the rack (facing the barbell sleeve).  Once you put plates on the bar you will not be able to adjust the rack.  This may not be a big deal when you are training alone, but it truly sucks if you’re training with someone, or if you’re at a competition.  You’re better off to just always put the pins in with the thick part to the inside of the rack.

Whereas each upright comes with two pins, the spotting arms come with one pin.  To adjust, simply lift up on the arm and put the pin in the number that represents your desired height.


Step 3 – Setting the Rack In or Out (SQUAT ONLY)

A large majority of lifters are going to be able to skip this step, but it’s a good rack feature to know about (especially if you are ever going to volunteer at a meet; inevitably someone will want racks in).

With the racks “in”, the uprights will be angled inwards ( / \ ) as opposed to being straight up and down ( | | ):


Lifters who grip the bar closer to the collars will often ask for racks in to give themselves more space for their hands.  You may also encounter some lifters who choose to have either the left or right rack in (and then other out).  Thankfully, it’s very quick and easy to switch the position of the rack, and this can be done even with a fully loaded bar.  Simply locate where the upright fits into a sleeve – there will be moveable cuff (typically with wingnuts on it) that you can lift upwards.  With this cuff up, you will be able to either push the upright into the racks out position, or pull it to the racks in position.  When you’re done, you just put the cuff back down into the sleeve.

2023年1月16日星期一

What Features Do I Need to Consider for Hiking Poles

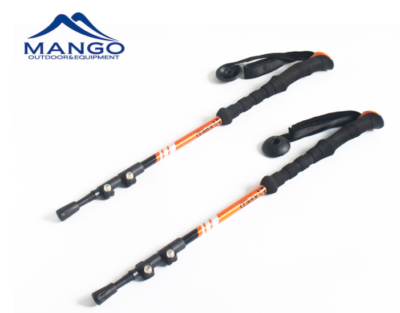
Trekking poles and hiking sticks are standard equipment for many walkers, hikers, trekkers, backpackers and snowshoers. The reason is simple: they enhance your stability and provide support for all types of terrain.

Depending on how you plan to use the poles, you may want to consider poles that have some of the following features.

Adjustable

Many trekking poles are adjustable in length to improve stability on different terrain. They are usually adjusted to be about 24 to 55 inches long. Often, you will need to shorten the pole on uphill and lengthen it on downhill.

Non-Adjustable

The length of some trekking poles cannot be adjusted. They are great for activities where you know you only need a certain length.

Collapsible

Collapsible trekking poles function somewhat like tent poles, rather than folding into themselves like adjustable poles do.

Adjustable Aluminum Trekking Pole for Hiking MW1013

Foldable

Collapsible trekking poles function a bit like tent poles, rather than folding into themselves like adjustable poles. Collapsible poles are usually the easiest to pack and are usually very lightweight and quick to deploy. They are especially popular among ultrarunners and fast hikers.

Shock Absorbing Poles

These poles offer internal springs that absorb shock as you go downhill. For most bars, this feature can be turned off when not needed, such as when going uphill. Shock absorption is a nice feature for any hiker, but is especially recommended if you have an unstable hip, knee or ankle or have had any previous injuries to these joints.

Ultralight

The advantage of ultralight clubs is that the swing weight is lighter, which makes them easier and faster to move. On long hikes, this means less fatigue. Ultralight clubs are also easier to pack. The material of the shaft is a key determinant of the overall weight of the pole, and REI classifies ultralight poles as those weighing less than 1 pound per pair.

Tips for using trekking poles

Fortunately, there is a quick learning curve for using trekking poles. With a few tips and suggestions, you’ll be ready to hit the trail.

Alternate your poles and legs

Most hikers are used to using their trekking poles quickly and getting into a proper rhythm with the opposite foot (right foot, left foot, left foot, right foot, etc.) planting the opposite pole in time. If you lose your rhythm, simply keep walking while lifting the pole off the ground for a moment so you can reset.

Walking naturally

When using trekking poles, it is best to walk naturally, keeping your arms swinging naturally, as if you did not have poles in your hands. The poles may be tilted slightly behind you so that you can push off to help you move forward as you plant them.

Trekking poles can be very useful when you encounter obstacles on the trail. When you have to wade through water, poles can provide much needed stability. In order to stand up on boulders, poles can give you a useful push. To straddle the logs, simply plant the poles in the ground and use them to maintain stability. If you are walking over a log to cross water, you can use the poles to extend the poles out to the sides to improve balance.

In conclusion, there are many factors to consider when buying trekking poles. This article is only a part of the introduction, we will continue to update the blog afterwards, you are welcome to consult us to get a product quote, MANGO provides professional solutions.

Related Products:

camping chair

lightweight portable folding stool

Wholesale camping chair

best collapsible walking stick

racing ski poles

What is a rapid drug test and how does it work?

  What is a rapid drug test?

A rapid drug test is a type of drug test that provides quick and accurate results in a short amount of time. These tests typically use a small sample of urine, saliva, or blood, and can detect the presence of drugs such as marijuana, cocaine, amphetamines, and opiates. Rapid drug tests are often used in workplaces, schools, and other settings where quick results are needed to make decisions or take action. They are also used in medical settings to quickly determine if a patient has taken a specific drug.


QQ图片20230116170640.png


How do rapid urine drug tests work?

Rapid urine drug tests typically work by using a small sample of urine and a test strip or cassette that contains chemically treated pads. These pads are designed to react with specific drug compounds if they are present in the urine sample. The test is typically performed by dipping the test strip or cassette into the urine sample, or by using a dropper to apply a small amount of urine to the test strip.


After a short waiting period, usually between a few seconds and a few minutes, the results of the test can be read. If the test is positive for a specific drug, one or more lines or symbols will appear on the test strip. If the test is negative, no lines or symbols will appear.


It is important to note that the accuracy of rapid urine drug tests can vary depending on the quality of the test and the specific drugs being tested for. False positive and false negative results can occur, so it's important to confirm positive results with a more accurate and sensitive test such as lab based testing.

2023年1月15日星期日

Do You Know which Fruits are Good for Lung Health

The hot summer is over, and autumn is coming, but the weather in autumn is mainly dry, and in dry weather, everyone needs to stay well hydrated. In addition, autumn corresponds to the lungs in the five elements, and dryness in autumn can easily damage the health of the lungs. Therefore, eating more of the following three fruits in autumn will help prevent dryness in autumn and keep your body healthy.


Autumn is the "golden season" for nourishing the lungs, and the lungs' favorite foods are the following three fruits.

1. Pears

Autumn is the season when we often have colds, coughs and sore throats, but this is the time of year when we should be eating more Sydney. It has the functions of moistening the lungs, removing dryness, resolving phlegm and relieving cough. Therefore, in autumn, eat more Sydney and drink more water, take care of your lungs and not cough!

There are many kinds of pears, the more famous pear varieties in China are Huangguan Pear, Ya Pear, Snow Pear.

Huangguan Pear

Huangguan Pear contains a certain amount of protein, fat, carotene, vitamin B1, vitamin B2, malic acid, etc., which are all essential substances for the human body. However, pears are cold in nature, and it is not easy for ordinary people to eat too much, especially those with cold body.


Ya Pear

Ya Pear is an ancient local variety in Hebei Province. Strong adaptability, good yield, large and beautiful fruit, crispy and juicy flesh, sweet and storable. Pears can clear the throat and reduce fire. Broadcasters and singers often eat cooked pears, which can increase the body fluid in the mouth and maintain the throat.


Snow Pear

Snow Pear can be eaten raw, steamed, or made into soups and soups. Pears also have the effect of lowering blood pressure and nourishing yin and clearing heat, so it is beneficial for patients with hypertension, hepatitis and liver cirrhosis to eat pears often.


2. Loquat

The loquat is another very popular fruit in the fall, with its yellow skin and sweet pulp that will make your mouth water. Loquats are rich in nutrients, vitamins and trace elements. Eating more loquats in autumn helps to clear the lungs and heat, resolve phlegm, relieve cough and quench thirst.

3. Grapefruit

Speaking of grapefruit, many people love it and take it home with a bag! Pomelo is not only delicious, but also rich in nutrients and vitamin C. Eating grapefruit can promote body fluid, quench thirst, nourish the lungs, and often make the throat uncomfortable. Friends who have a cough may wish to eat more grapefruit in autumn.

Related Products:
Chinese pear health benefits
White pear
Crispy Crown Pear
Sweet pear
Snow pears
China export pea
Vitamin-rich snow pear
Are pears healthy
Red pear nutrition
How to eat a pear
Calories in One Pear
Asian Pear Benefits
Can Cats Eat Pears

What Are the Benefits of a Mesh Hat?

  Looking for a lightweight, breathable hat that suits outdoor activities? Discover why mesh hats are a top choice for comfort and style. Me...